> ## Documentation Index
> Fetch the complete documentation index at: https://docs.fire.rest/llms.txt
> Use this file to discover all available pages before exploring further.
# Screen actions
> What a kitchen operator can do on the Fire KDS screen: send, hold, undo, cancel, change pages and adjust settings.
The KDS screen is the kitchen display where operators see live orders and mark them as prepared. It runs full screen on a touch device and updates in real time, so every screen in the store stays in sync.
This guide covers the actions you can perform during service. For how a KDS is set up and linked, ask your administrator.
## The screen at a glance
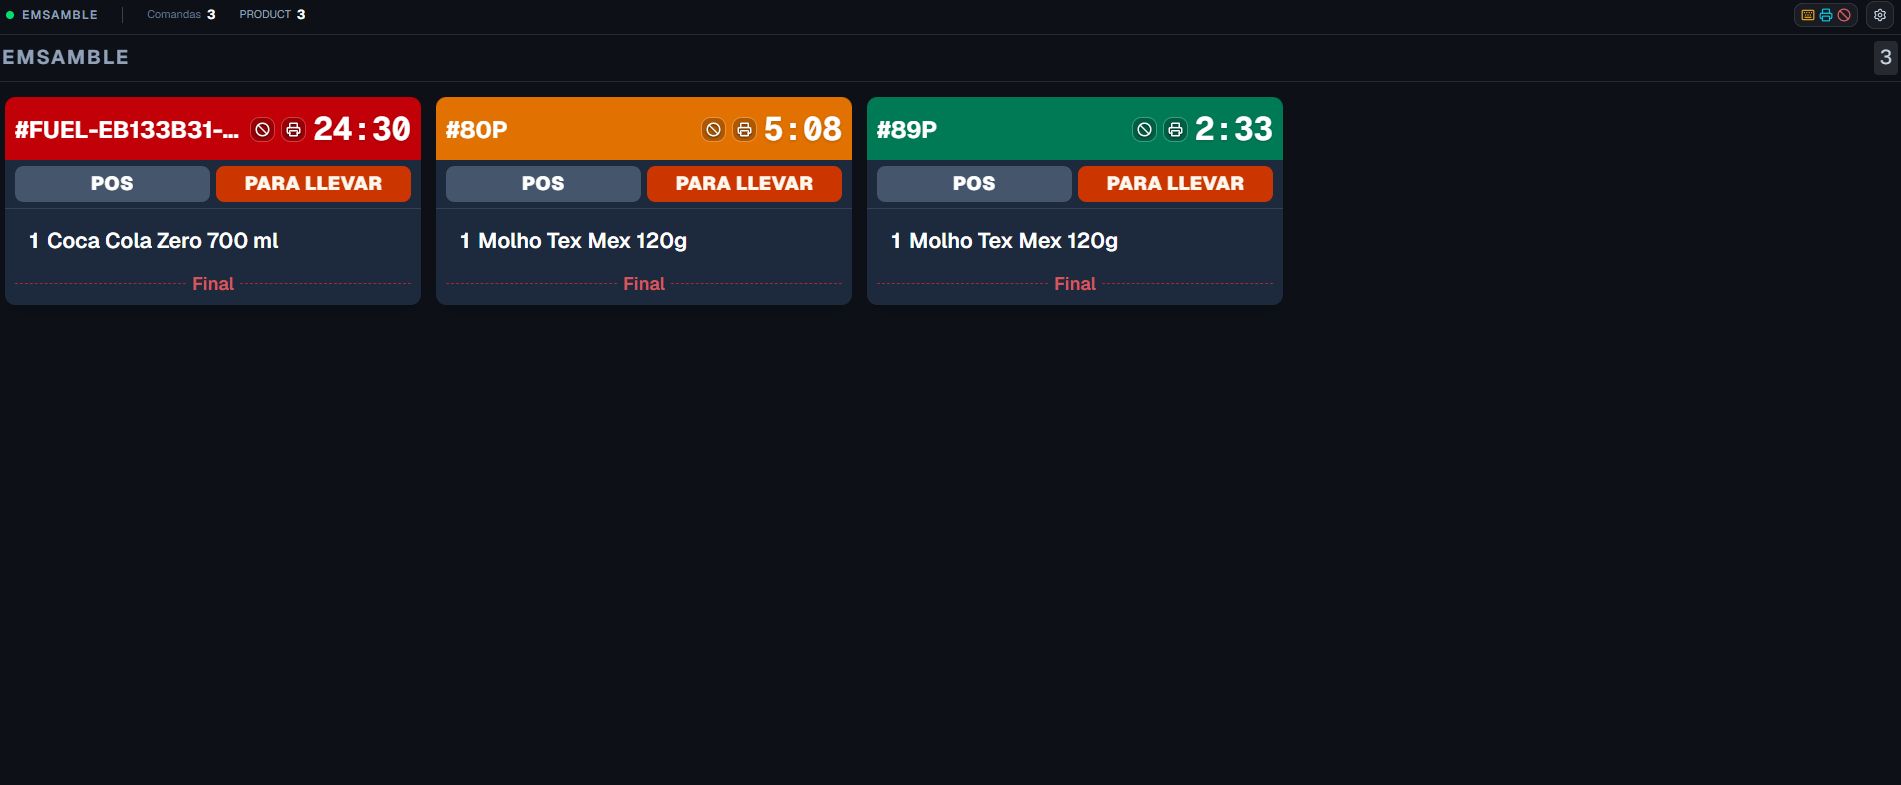
Orders are grouped into **station columns** — one column per station assigned to the screen (for example, *Fry* and *Sandwich*). Each order is a **ticket card** that shows:
* A short order code in the header (for example, `#A7F2C`).
* **Channel** and **fulfillment** badges (such as the sales channel and pickup or delivery).
* The list of items to prepare.
* A **timer** that changes color as the order ages: green, then amber, then red.
 ## Send an order (bump)
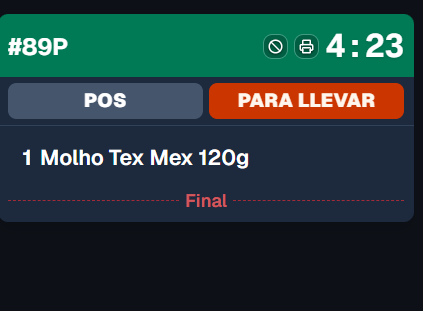
When you finish preparing the items on a card, **tap the card once** to send it. The ticket is marked as done and leaves the queue.
## Send an order (bump)
When you finish preparing the items on a card, **tap the card once** to send it. The ticket is marked as done and leaves the queue.
 On screens with a USB button panel or keyboard, you can also send the order with the assigned key instead of tapping. See [Keyboard and button panel](#keyboard-and-button-panel).
## Strike lines before send (optional)
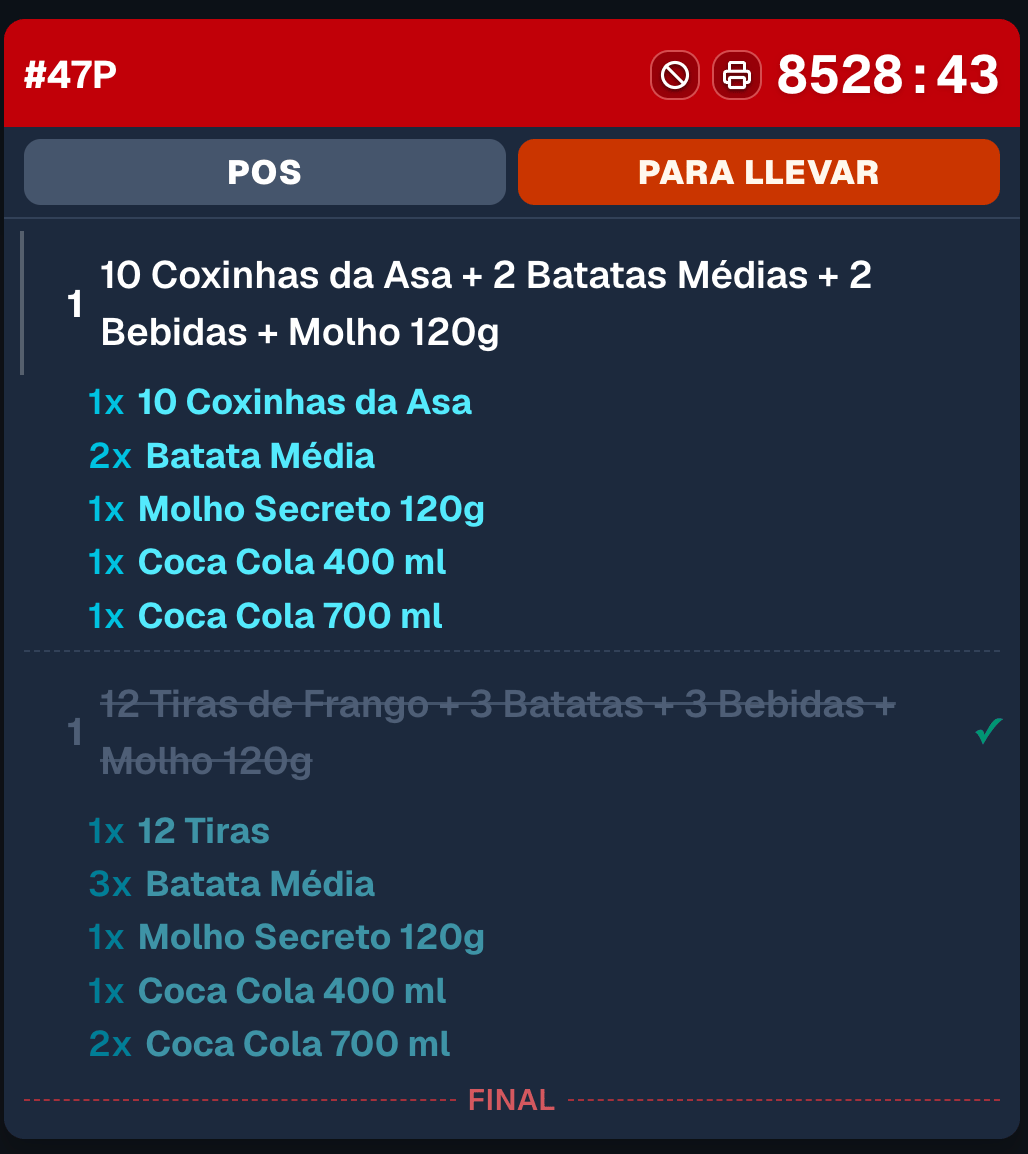
When **line strike** is enabled for the store (or overridden on this screen), you must **tap each parent line** on the ticket before you can send it. Struck lines show as crossed out. When every required line is struck, the card shows a ready state (green ring) — then tap the card body to bump.
If lines are still pending, tapping the card body does nothing. Undo / recall after a bump clears the strikes for that ticket on the station.
On screens with a USB button panel or keyboard, you can also send the order with the assigned key instead of tapping. See [Keyboard and button panel](#keyboard-and-button-panel).
## Strike lines before send (optional)
When **line strike** is enabled for the store (or overridden on this screen), you must **tap each parent line** on the ticket before you can send it. Struck lines show as crossed out. When every required line is struck, the card shows a ready state (green ring) — then tap the card body to bump.
If lines are still pending, tapping the card body does nothing. Undo / recall after a bump clears the strikes for that ticket on the station.
 Your administrator chooses which stations require line strike. You can also open the **line strike** settings from the top bar when a local screen override is allowed.
## Waiting for assembly (dispatch)
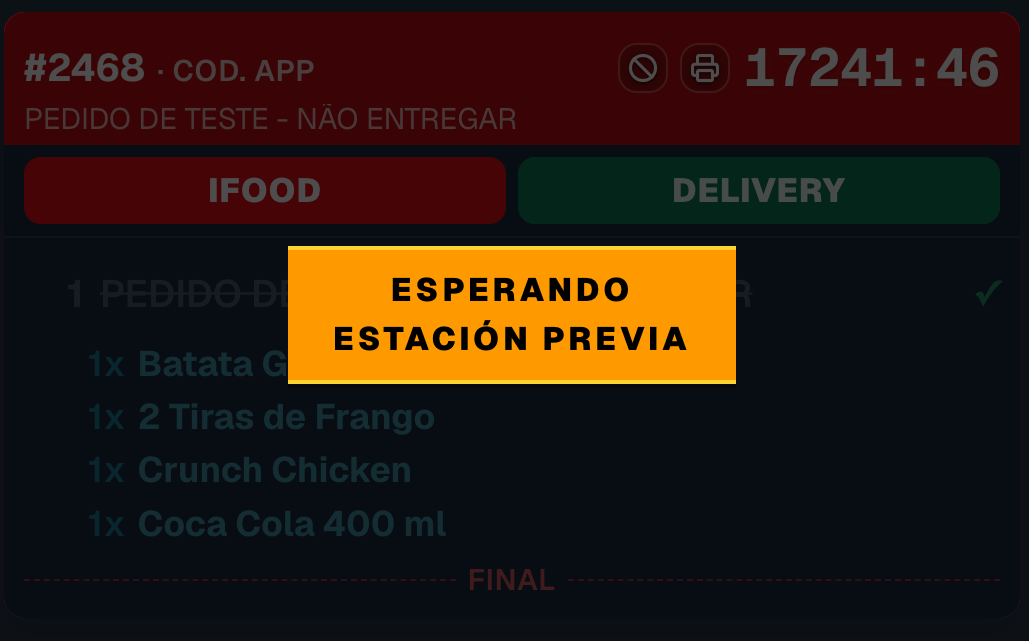
On a **DISPATCH** column, a ticket can be visible while assembly (or pre-assembly) is still working. In that case the bump stays blocked and the card shows an **awaiting upstream** hint. You can still strike lines if line strike is on; send unlocks when assembly finishes.
Your administrator chooses which stations require line strike. You can also open the **line strike** settings from the top bar when a local screen override is allowed.
## Waiting for assembly (dispatch)
On a **DISPATCH** column, a ticket can be visible while assembly (or pre-assembly) is still working. In that case the bump stays blocked and the card shows an **awaiting upstream** hint. You can still strike lines if line strike is on; send unlocks when assembly finishes.
 ## Put an order on hold and release it
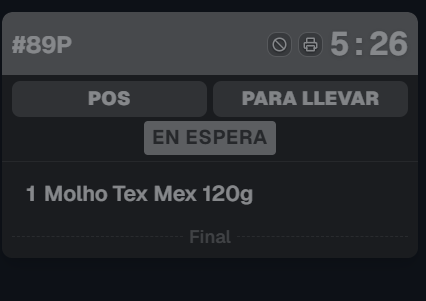
If an order needs to wait (the customer is not ready, an item is missing), **press and hold the card** until the progress bar fills. The card turns gray, shows an **ON HOLD** label, and moves to the end of the queue.
A held order is paused on **every** screen in the store, not only yours. To release it, **press and hold it again** — it returns to its normal position in the queue.
## Put an order on hold and release it
If an order needs to wait (the customer is not ready, an item is missing), **press and hold the card** until the progress bar fills. The card turns gray, shows an **ON HOLD** label, and moves to the end of the queue.
A held order is paused on **every** screen in the store, not only yours. To release it, **press and hold it again** — it returns to its normal position in the queue.
 ## Undo a send (recall)
Sent an order by mistake? Right after sending, an **Undo** bar appears at the bottom of the column showing the order code. Tap **Undo** to bring the ticket back to the queue.
## Undo a send (recall)
Sent an order by mistake? Right after sending, an **Undo** bar appears at the bottom of the column showing the order code. Tap **Undo** to bring the ticket back to the queue.
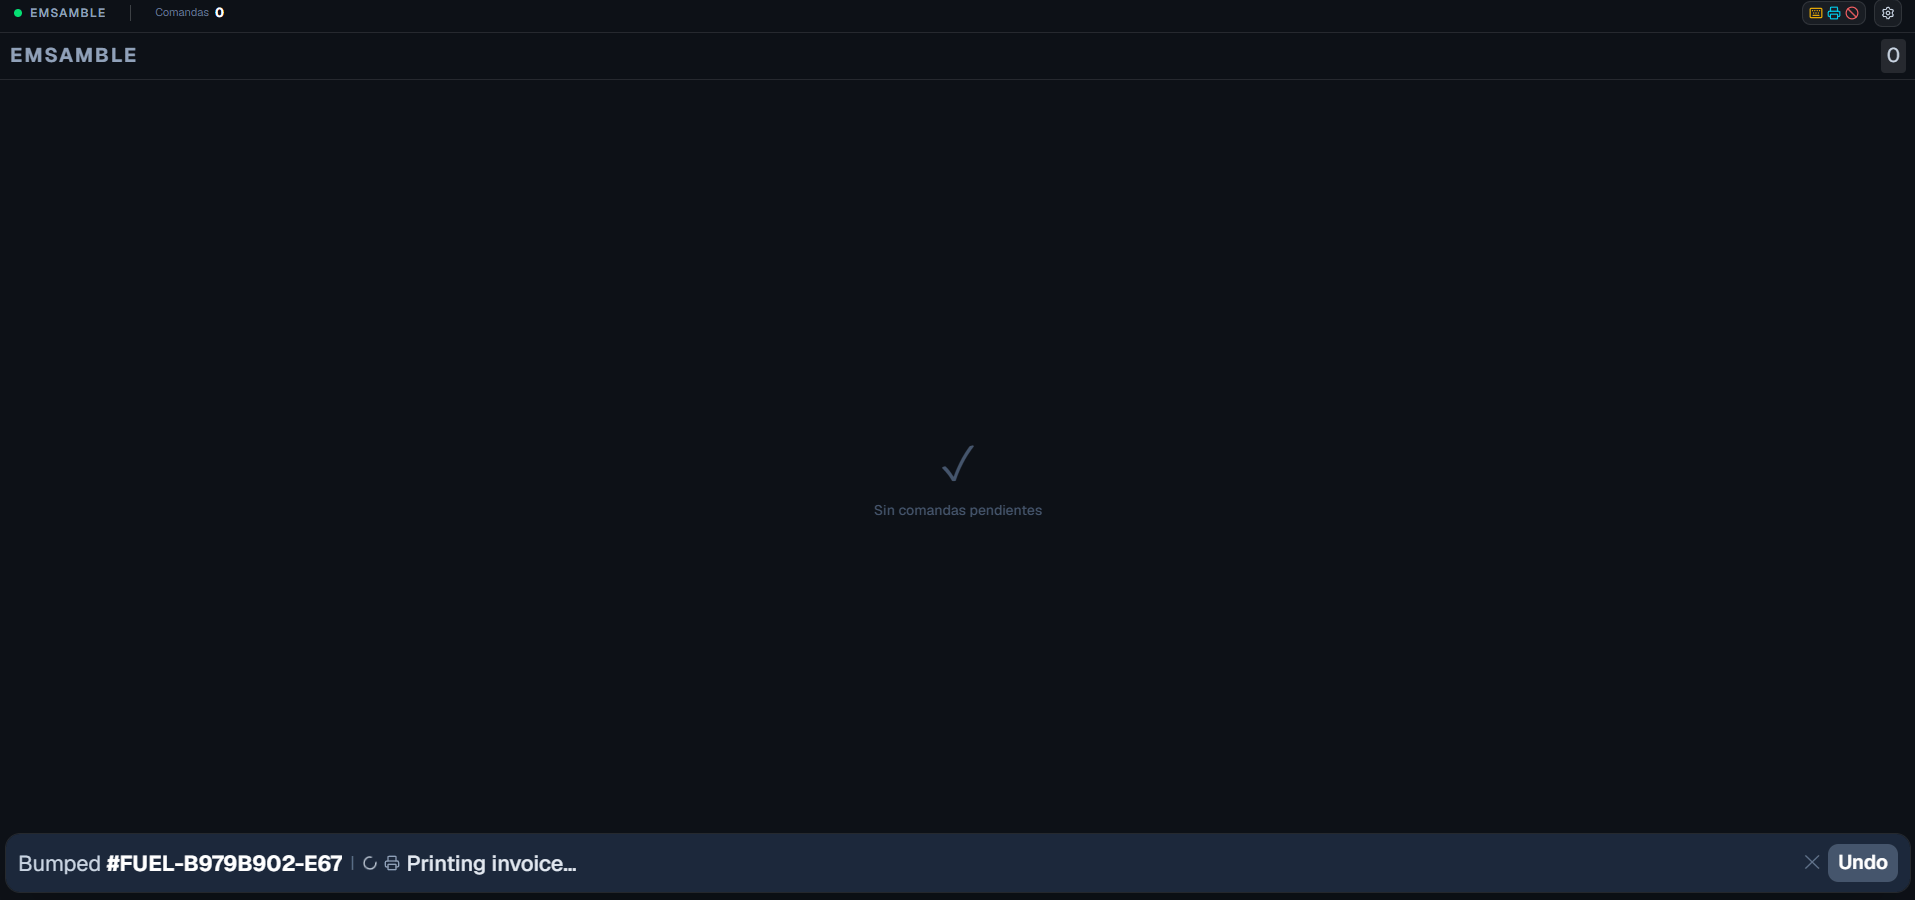 The Undo bar disappears on its own after a few minutes (set per station). You can also dismiss it with the **✕**. On screens with a keyboard, the `Z` key undoes the last send in the first column.
## Cancel an order
When order cancellation is enabled for the store, each ticket header shows a **ban** icon (). Tap it to cancel the order and confirm in the dialog. A status bar at the bottom of the column shows **Cancelling** and then **Cancelled**.
The Undo bar disappears on its own after a few minutes (set per station). You can also dismiss it with the **✕**. On screens with a keyboard, the `Z` key undoes the last send in the first column.
## Cancel an order
When order cancellation is enabled for the store, each ticket header shows a **ban** icon (). Tap it to cancel the order and confirm in the dialog. A status bar at the bottom of the column shows **Cancelling** and then **Cancelled**.
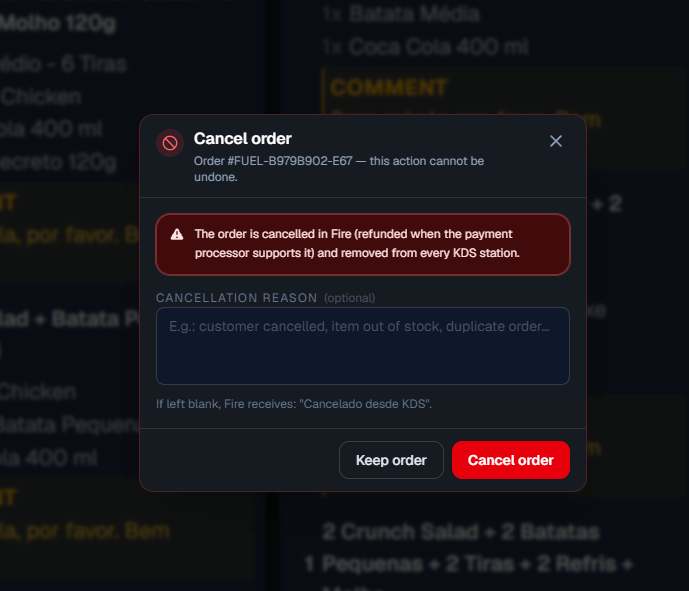 Cancelling removes the order from the kitchen. Confirm the order code before continuing.
## Change pages
When there are more orders than fit on screen, the orders split into pages. All columns change page together. You can move between pages in three ways:
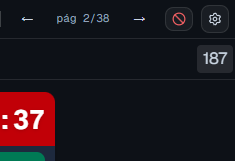
* **Top bar arrows:** tap **←** / **→** next to the page indicator (`page N/M`).
* **Swipe:** drag left or right across a column to go to the next or previous page.
* **Double tap:** double-tap an empty area to jump to the first or last page.
Cancelling removes the order from the kitchen. Confirm the order code before continuing.
## Change pages
When there are more orders than fit on screen, the orders split into pages. All columns change page together. You can move between pages in three ways:
* **Top bar arrows:** tap **←** / **→** next to the page indicator (`page N/M`).
* **Swipe:** drag left or right across a column to go to the next or previous page.
* **Double tap:** double-tap an empty area to jump to the first or last page.
 ## New-order alert
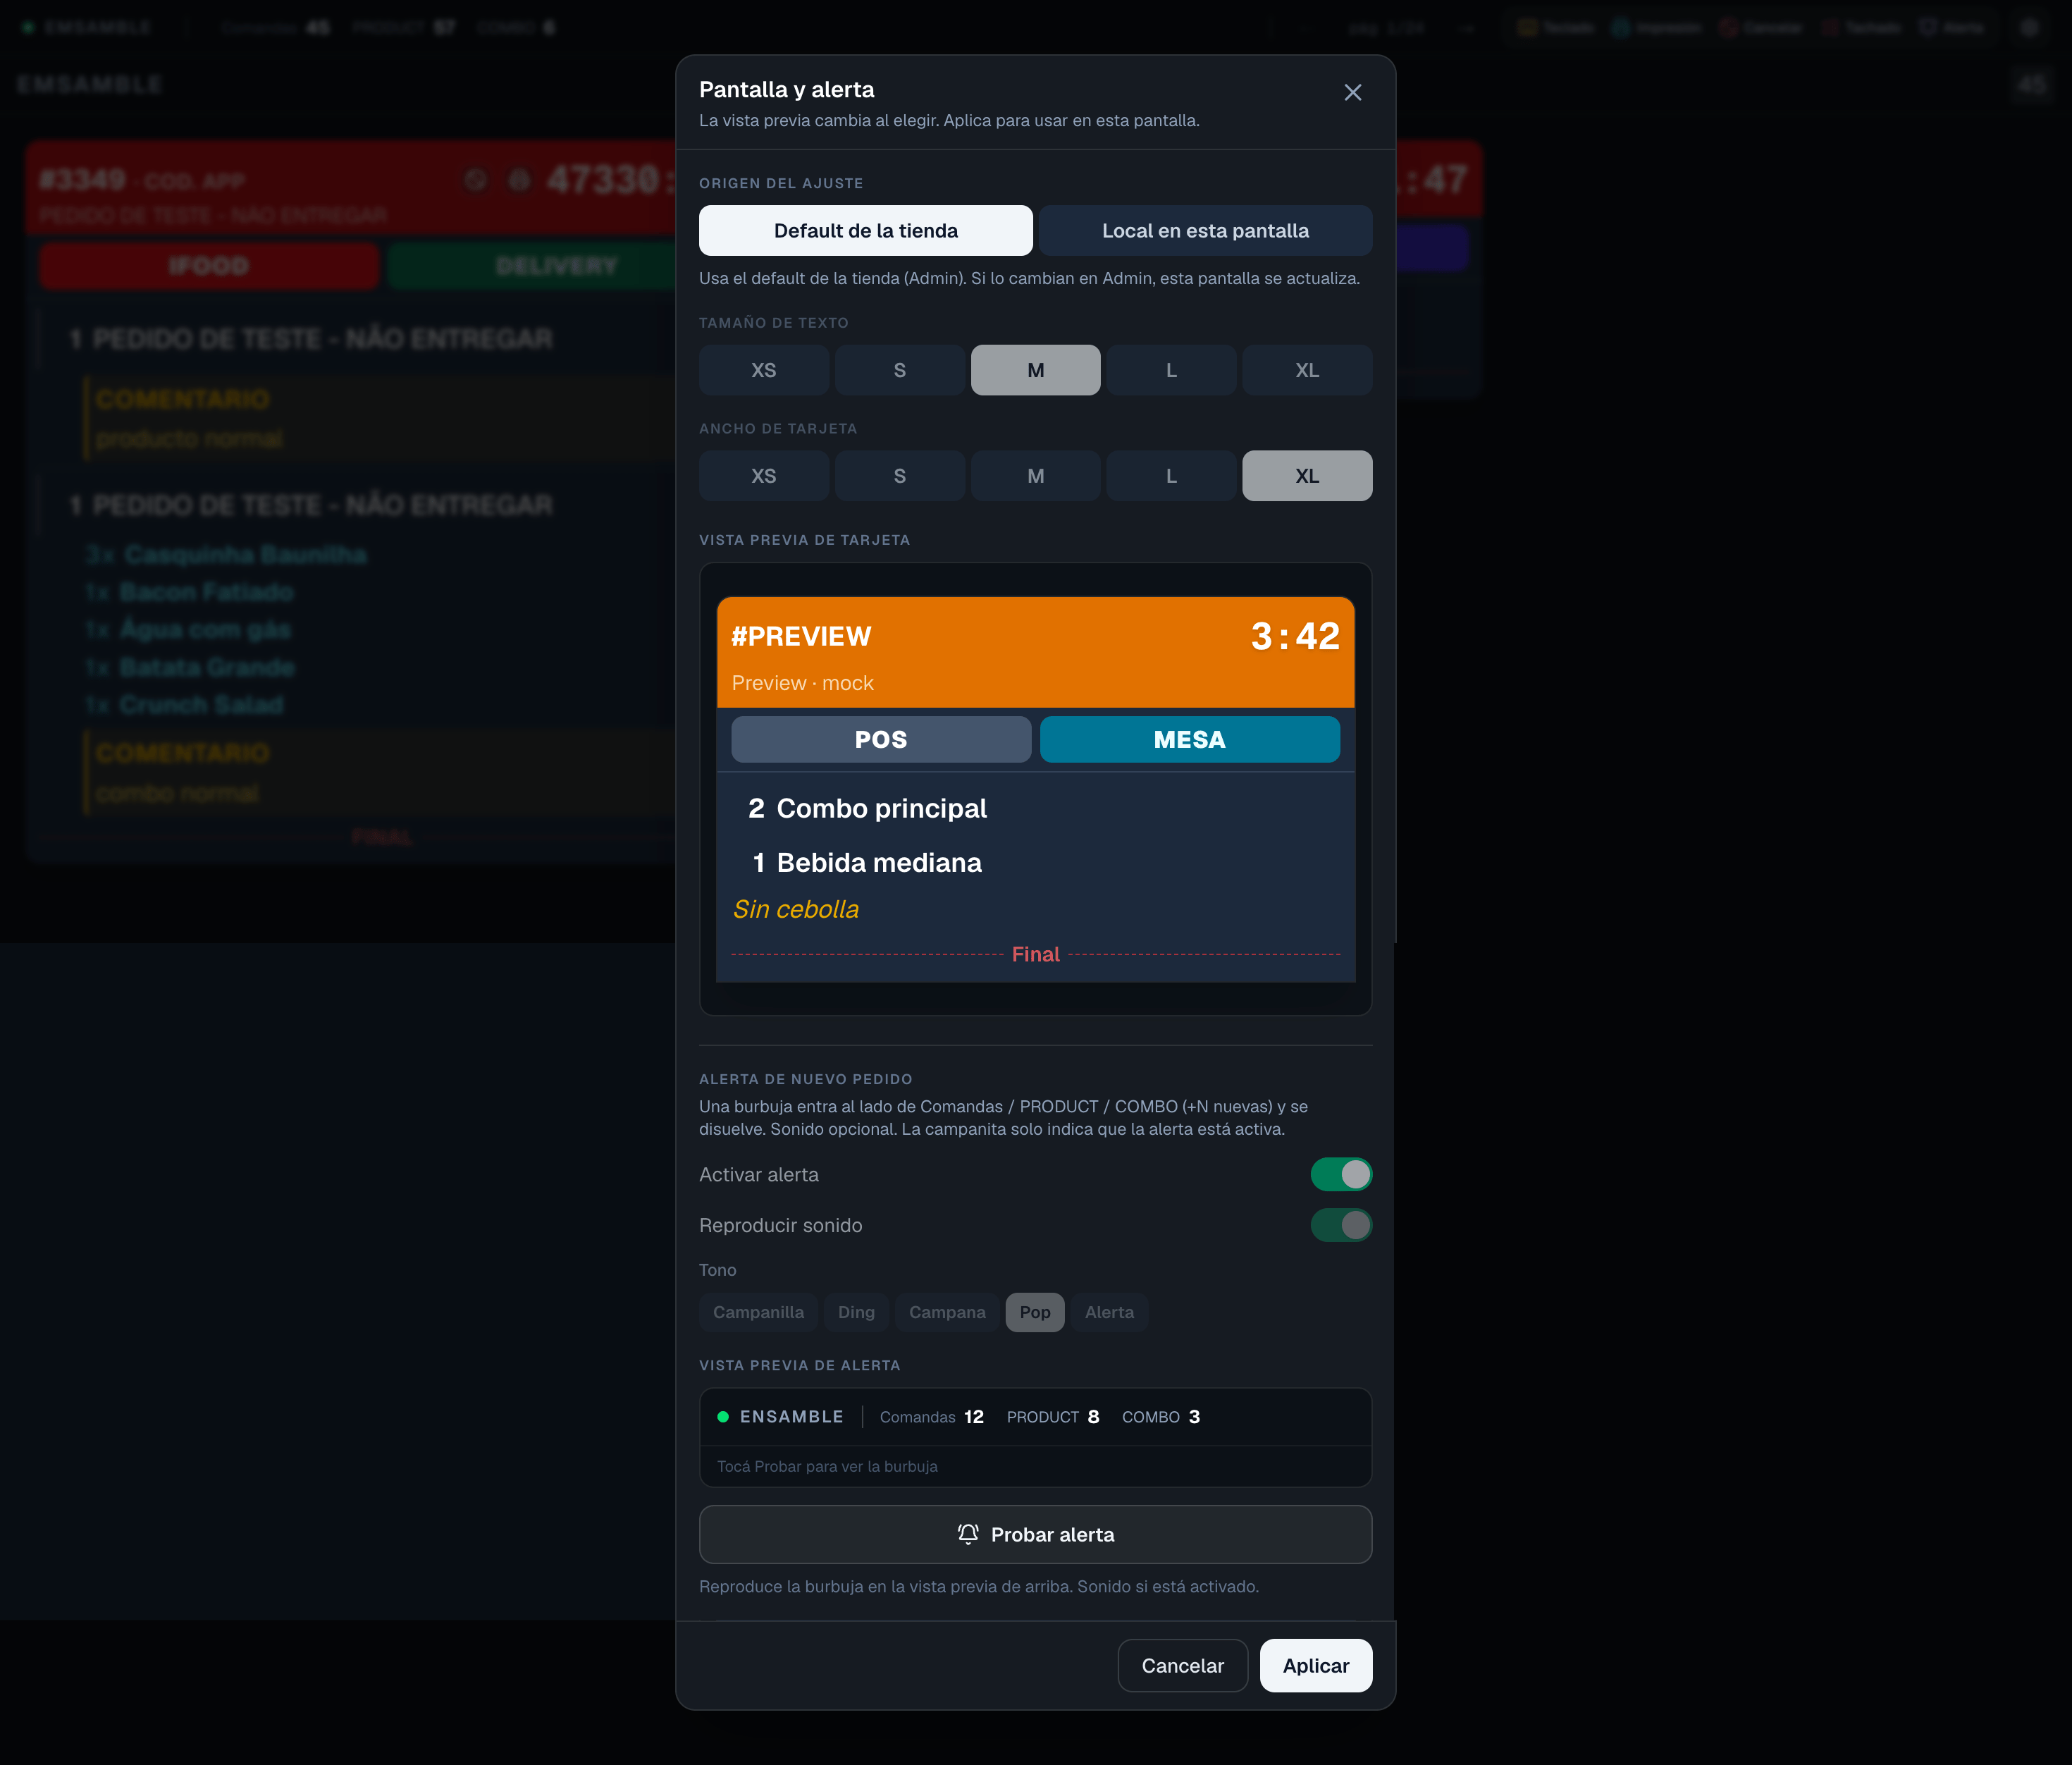
When a new ticket arrives, the screen can show a **visual bubble** and optionally play a sound. Your store’s KDS display defaults control this; each screen can follow the store default or keep a local override in **Settings → Display**.
## New-order alert
When a new ticket arrives, the screen can show a **visual bubble** and optionally play a sound. Your store’s KDS display defaults control this; each screen can follow the store default or keep a local override in **Settings → Display**.
 ## Settings menu
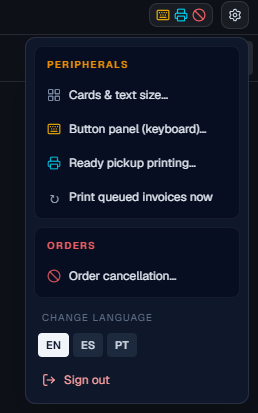
The gear button () in the top-right corner opens the operator tools:
* **Display:** typography, card size, new-order alert, and whether to show the customer name (optionally limited by fulfillment type or channel). Screens can follow **store defaults** or keep local values.
* **Button panel (keyboard):** map the physical keys of a USB button panel to actions.
* **Ready pickup printing:** printer and copies for assembly stations (see below).
* **Print queued invoices:** process any pending fiscal print jobs.
* **Language:** switch the interface between English, Spanish, and Portuguese.
* **Sign out.**
## Settings menu
The gear button () in the top-right corner opens the operator tools:
* **Display:** typography, card size, new-order alert, and whether to show the customer name (optionally limited by fulfillment type or channel). Screens can follow **store defaults** or keep local values.
* **Button panel (keyboard):** map the physical keys of a USB button panel to actions.
* **Ready pickup printing:** printer and copies for assembly stations (see below).
* **Print queued invoices:** process any pending fiscal print jobs.
* **Language:** switch the interface between English, Spanish, and Portuguese.
* **Sign out.**
 ## Ready pickup printing
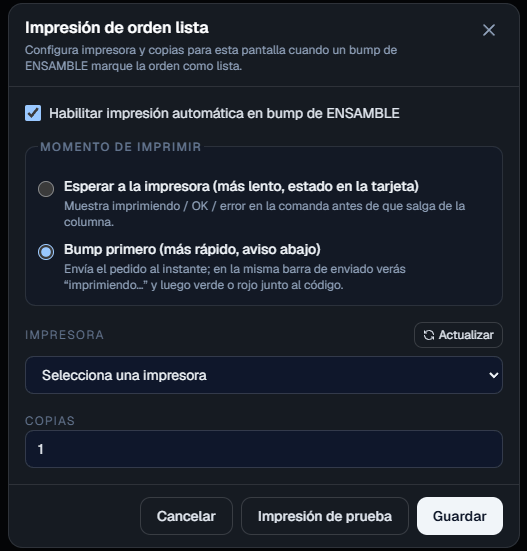
On **assembly** stations, sending an order can automatically print a pickup ticket on a local printer through Fire Agent. Set the printer and number of copies in **Settings → Ready pickup printing**. A printer icon in the top bar shows when auto-print is armed.
## Ready pickup printing
On **assembly** stations, sending an order can automatically print a pickup ticket on a local printer through Fire Agent. Set the printer and number of copies in **Settings → Ready pickup printing**. A printer icon in the top bar shows when auto-print is armed.
 ## Keyboard and button panel
Screens can use a physical keyboard or USB button panel for faster, no-touch operation. Without any setup, these default keys work:
| Key | Action |
| --------- | ---------------------------- |
| `1`–`8` | Send the order in column 1–8 |
| `→` / `←` | Next page / previous page |
| `Z` | Undo the last send |
| `F5` | Reload the screen |
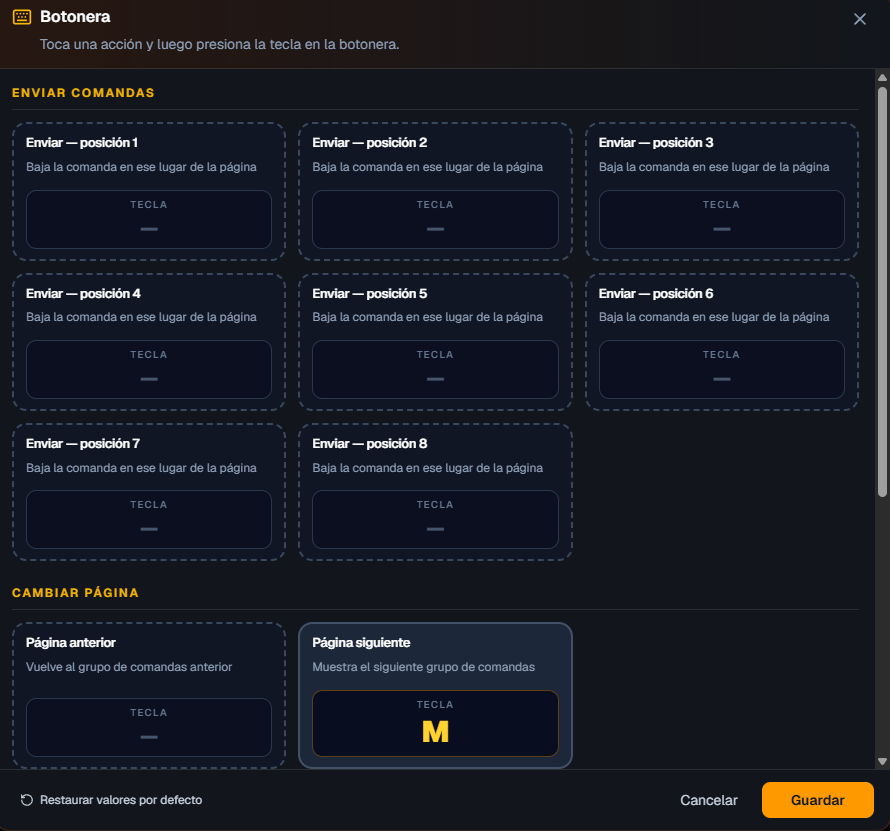
To customize the keys, open **Settings → Button panel (keyboard)**, tap an action, press the key you want to assign, and save.
## Keyboard and button panel
Screens can use a physical keyboard or USB button panel for faster, no-touch operation. Without any setup, these default keys work:
| Key | Action |
| --------- | ---------------------------- |
| `1`–`8` | Send the order in column 1–8 |
| `→` / `←` | Next page / previous page |
| `Z` | Undo the last send |
| `F5` | Reload the screen |
To customize the keys, open **Settings → Button panel (keyboard)**, tap an action, press the key you want to assign, and save.
 You can now run the KDS during service: send, hold, undo, and cancel orders, move between pages, and adjust the screen to your kitchen.