

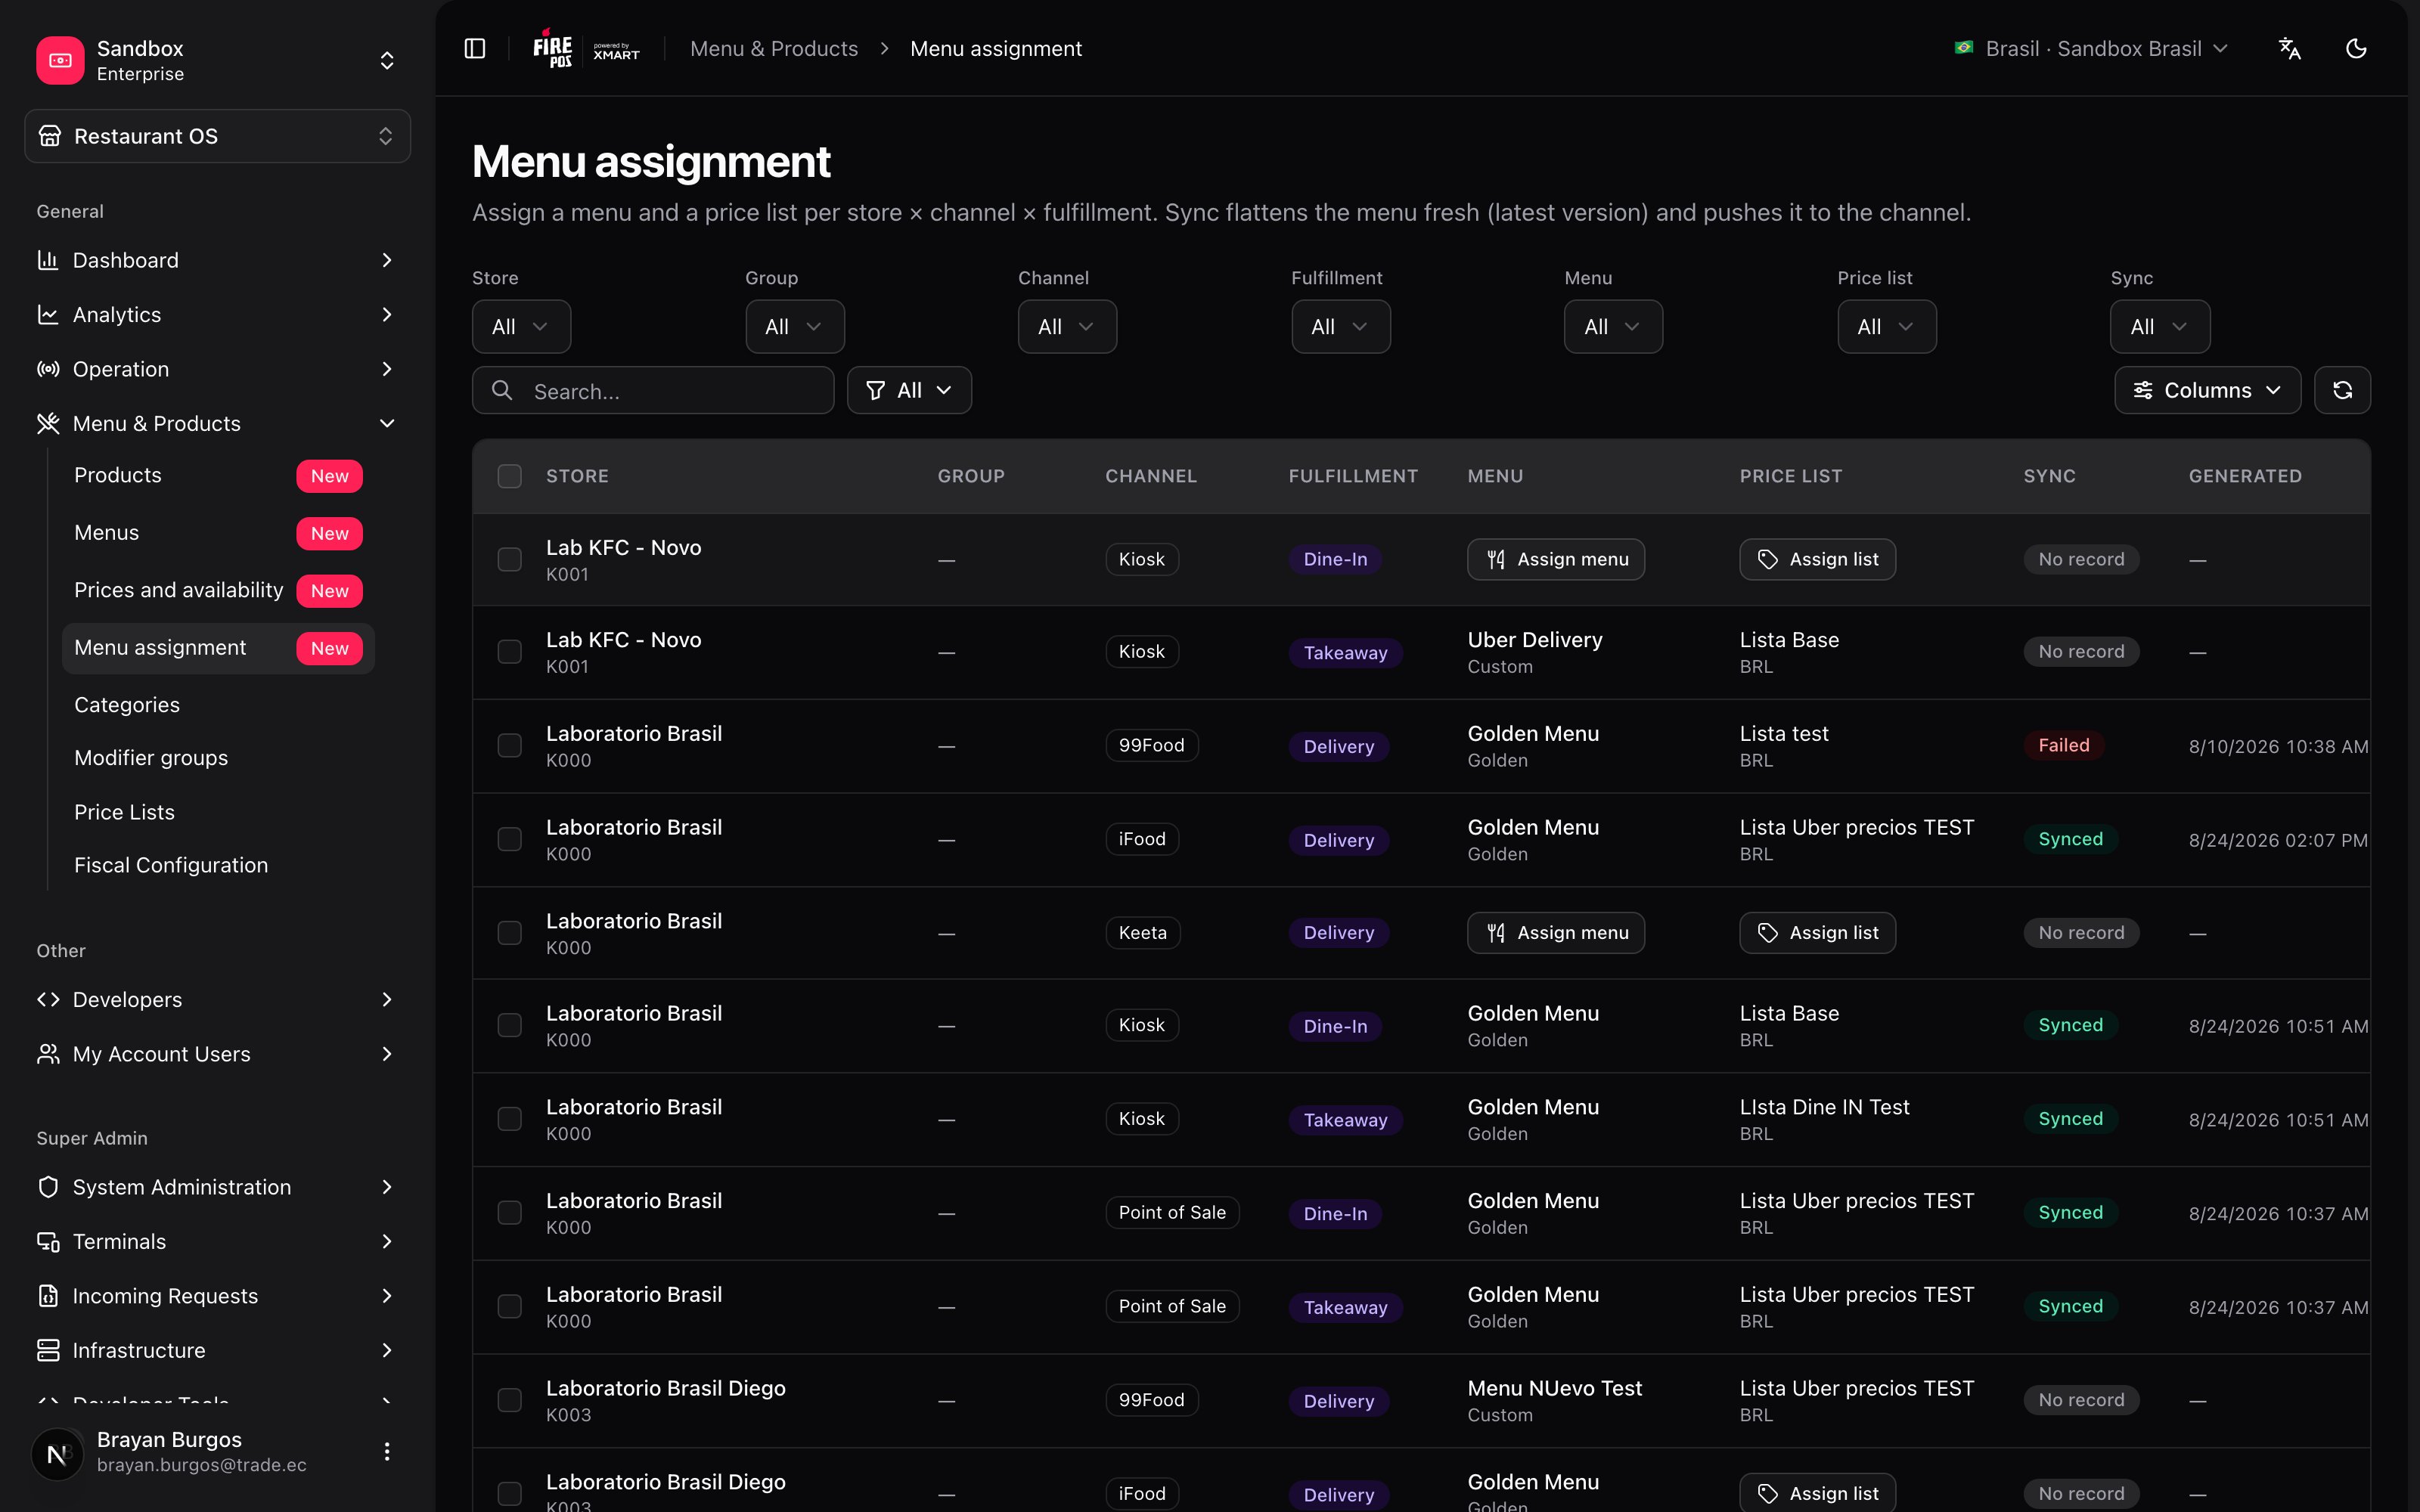
The minimum you need to know
1. The unit is the row: store × channel × fulfillment. One row per possible combination. The same store appears several times, once per channel and fulfillment type it serves.2. A row needs a menu and a price list. With only one of them it can’t be synced: the button stays disabled.3. Assigning does not publish. Publishing is Sync. And Sync sends what exists at that moment, not what existed when you assigned.
The simple path
You opened a new store and it needs to start selling:- Filter by that store with the Store selector.
- On each row you care about, Assign menu.
- On the same row, Assign list.
- Select the rows and Sync.
The matrix: one row per combination
Each row is a real selling destination. These are its columns:
At the top there are seven filters — store, group, channel, fulfillment, menu, list and sync status — and a search that matches store, menu and channel names. With forty stores and five channels the matrix has two hundred rows: the filters are not decoration.
What store groups are for. A group lets you filter every store in a region, a brand or a format at once, and assign them the same menu in a single operation. Without groups, changing a region’s delivery menu means ticking stores by hand and missing one.
Assigning in bulk
Tick several rows with the checkboxes and the bulk action bar appears: Assign menu, Assign list and Sync, with the count of what’s selected.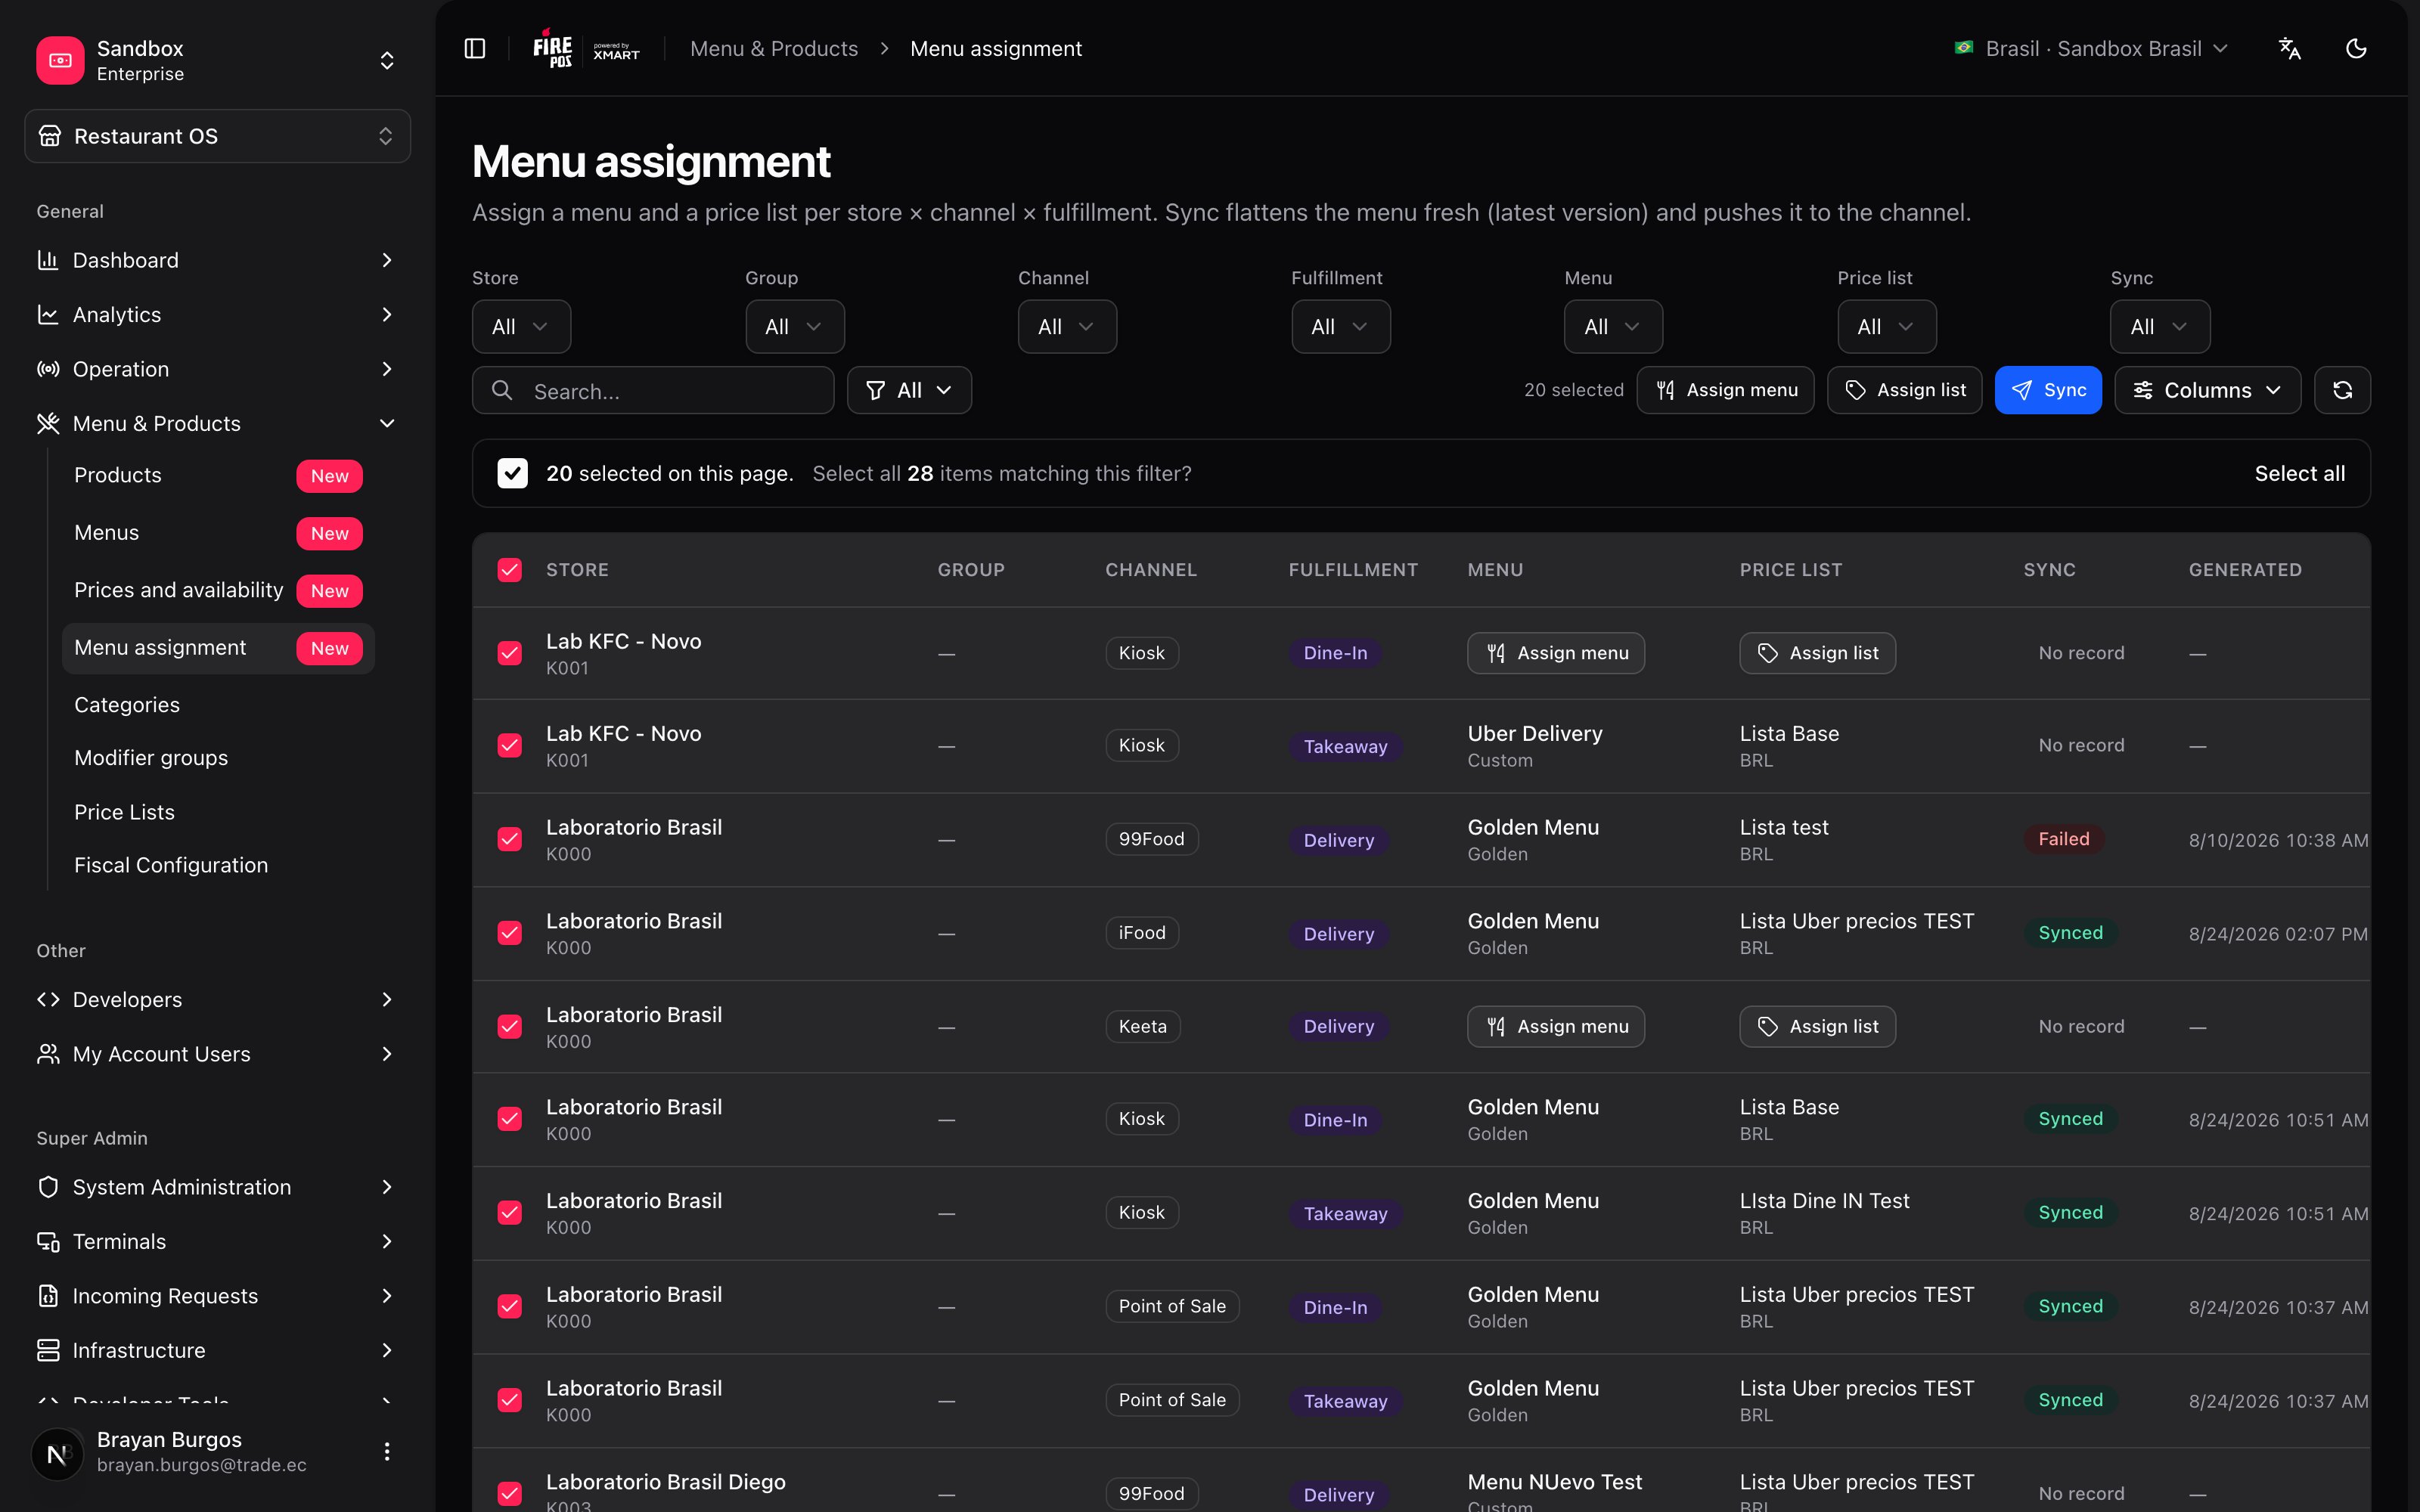
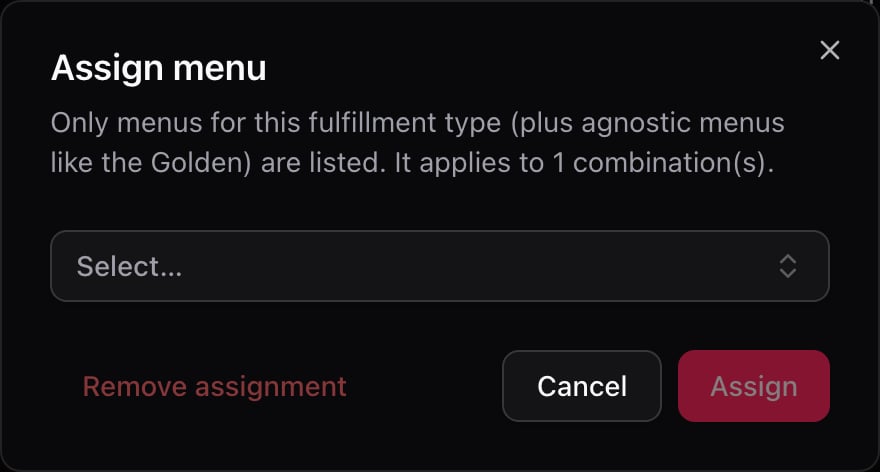
The fulfillment rule
The assign-menu dialog does not show you every menu. Only the ones serving that row’s fulfillment type, plus the agnostic ones — the Golden, which serves them all. It’s the same criterion that makes a menu’s fulfillment type final: a delivery menu on a dine-in row means nothing.Sync: what actually happens
Sync does three things, in this order:- It flattens the menu. It takes the menu’s structure, applies the assigned list’s prices, and builds a flat menu with no inheritance and no formulas: the literal list of what is sold and for how much.
- It sends it to the channel. The status turns Pending.
- It waits for confirmation. The channel answers later, on its own time, and the status settles on Synced or Failed.
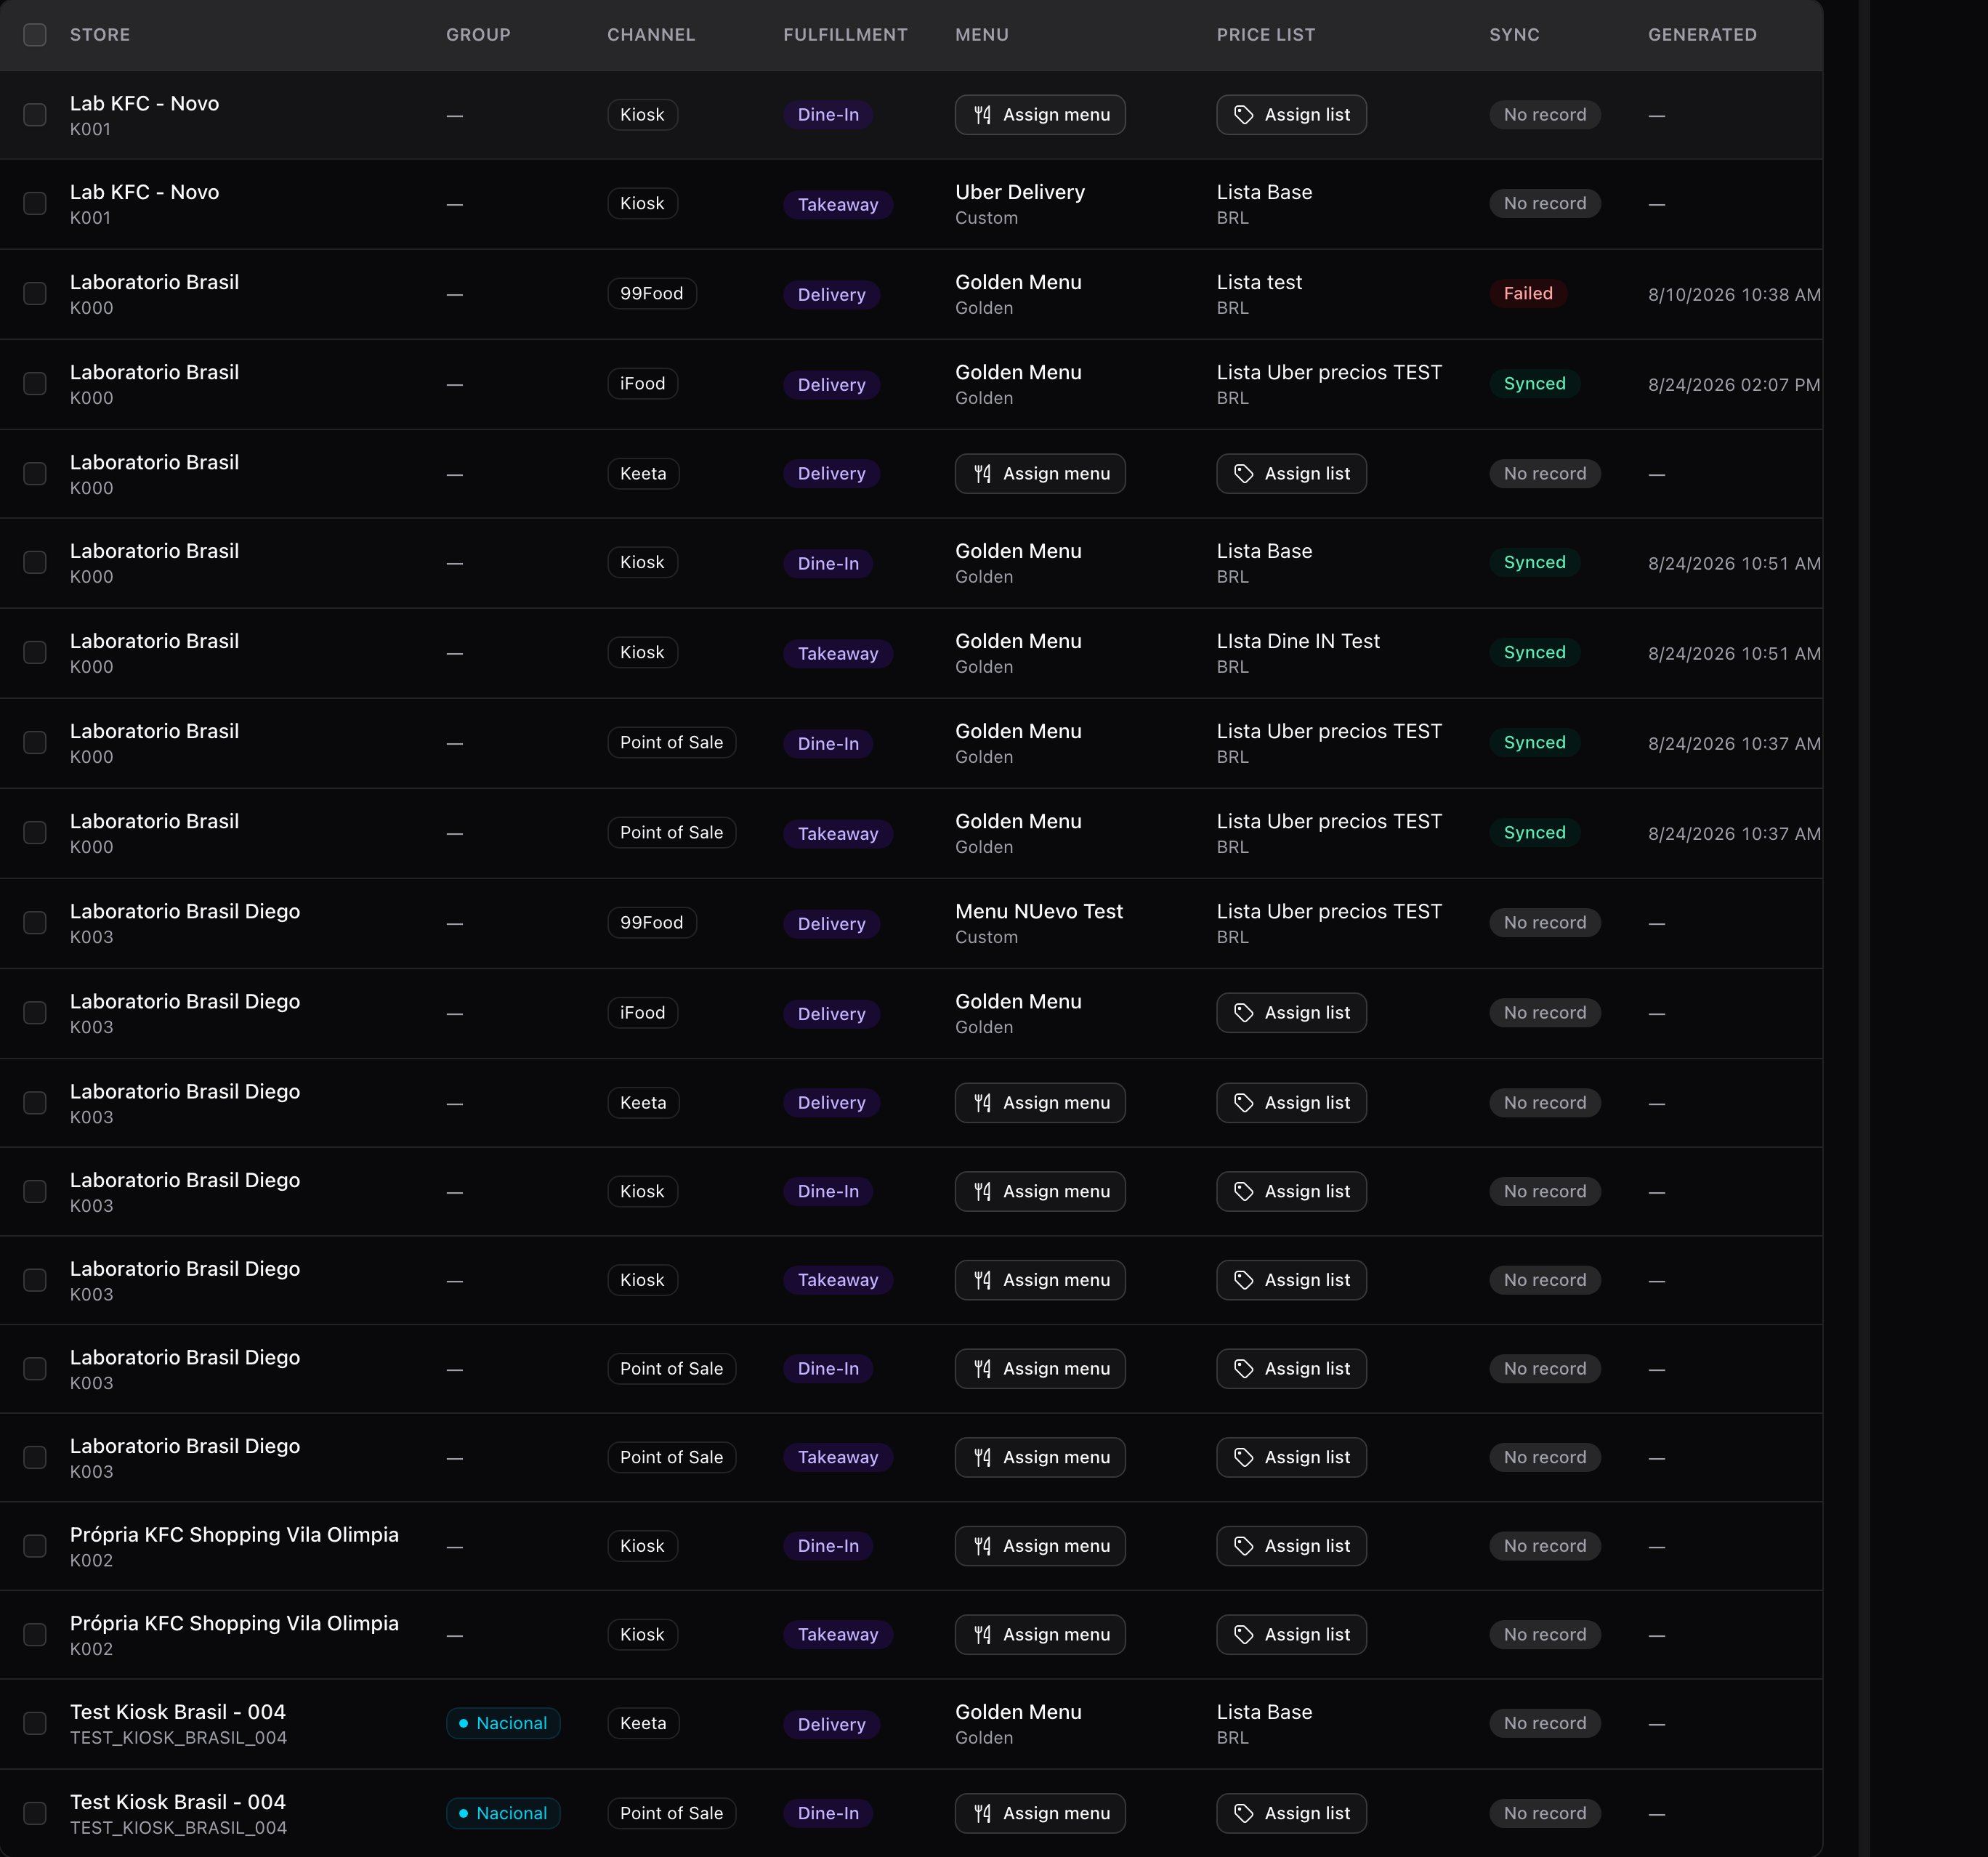
While there are rows in Pending, the screen refreshes itself every fifteen seconds. No need to reload or sit watching: you can walk away and come back.
The button stays disabled — “Assign a menu and a price list first” — while the row is missing the menu or the list. That’s on purpose: without a list, every price would go out at zero.
The snapshot is from now, not from yesterday
There are no versions. Sync sends the current state. It takes the menu and the list exactly as they are saved in that second. There is no “publish Monday’s version” and no going back to an earlier snapshot.That has a practical consequence worth keeping in mind: if somebody left the menu half-edited, that’s what goes out. Before syncing in bulk, it’s worth confirming the menu is in the state it should be.
It synced, but something was left out
A row can end up Synced and still have dropped things along the way. When that happens, a warnings chip appears in the Sync column.Batches: 50 at a time, one at a time
You can select as many rows as you like, but each dispatch processes at most 50. If you selected 120, the first 50 go out and the screen tells you: “Syncing the first 50 rows; 70 left for the next round”. On top of that, the channel processes one batch per vendor at a time. If a dispatch is in flight, the next one waits. It isn’t an arbitrary limit: flattening a menu is expensive, and sending two hundred menus at once ends in timeouts and half-finished syncs, which is worse than going in batches. Selected rows missing a menu or a list are skipped automatically, and the screen tells you how many.Seeing exactly what was sent
The eye button, View sync preview, opens that row’s last snapshot. It’s the only way to answer “what did the channel receive?” with certainty.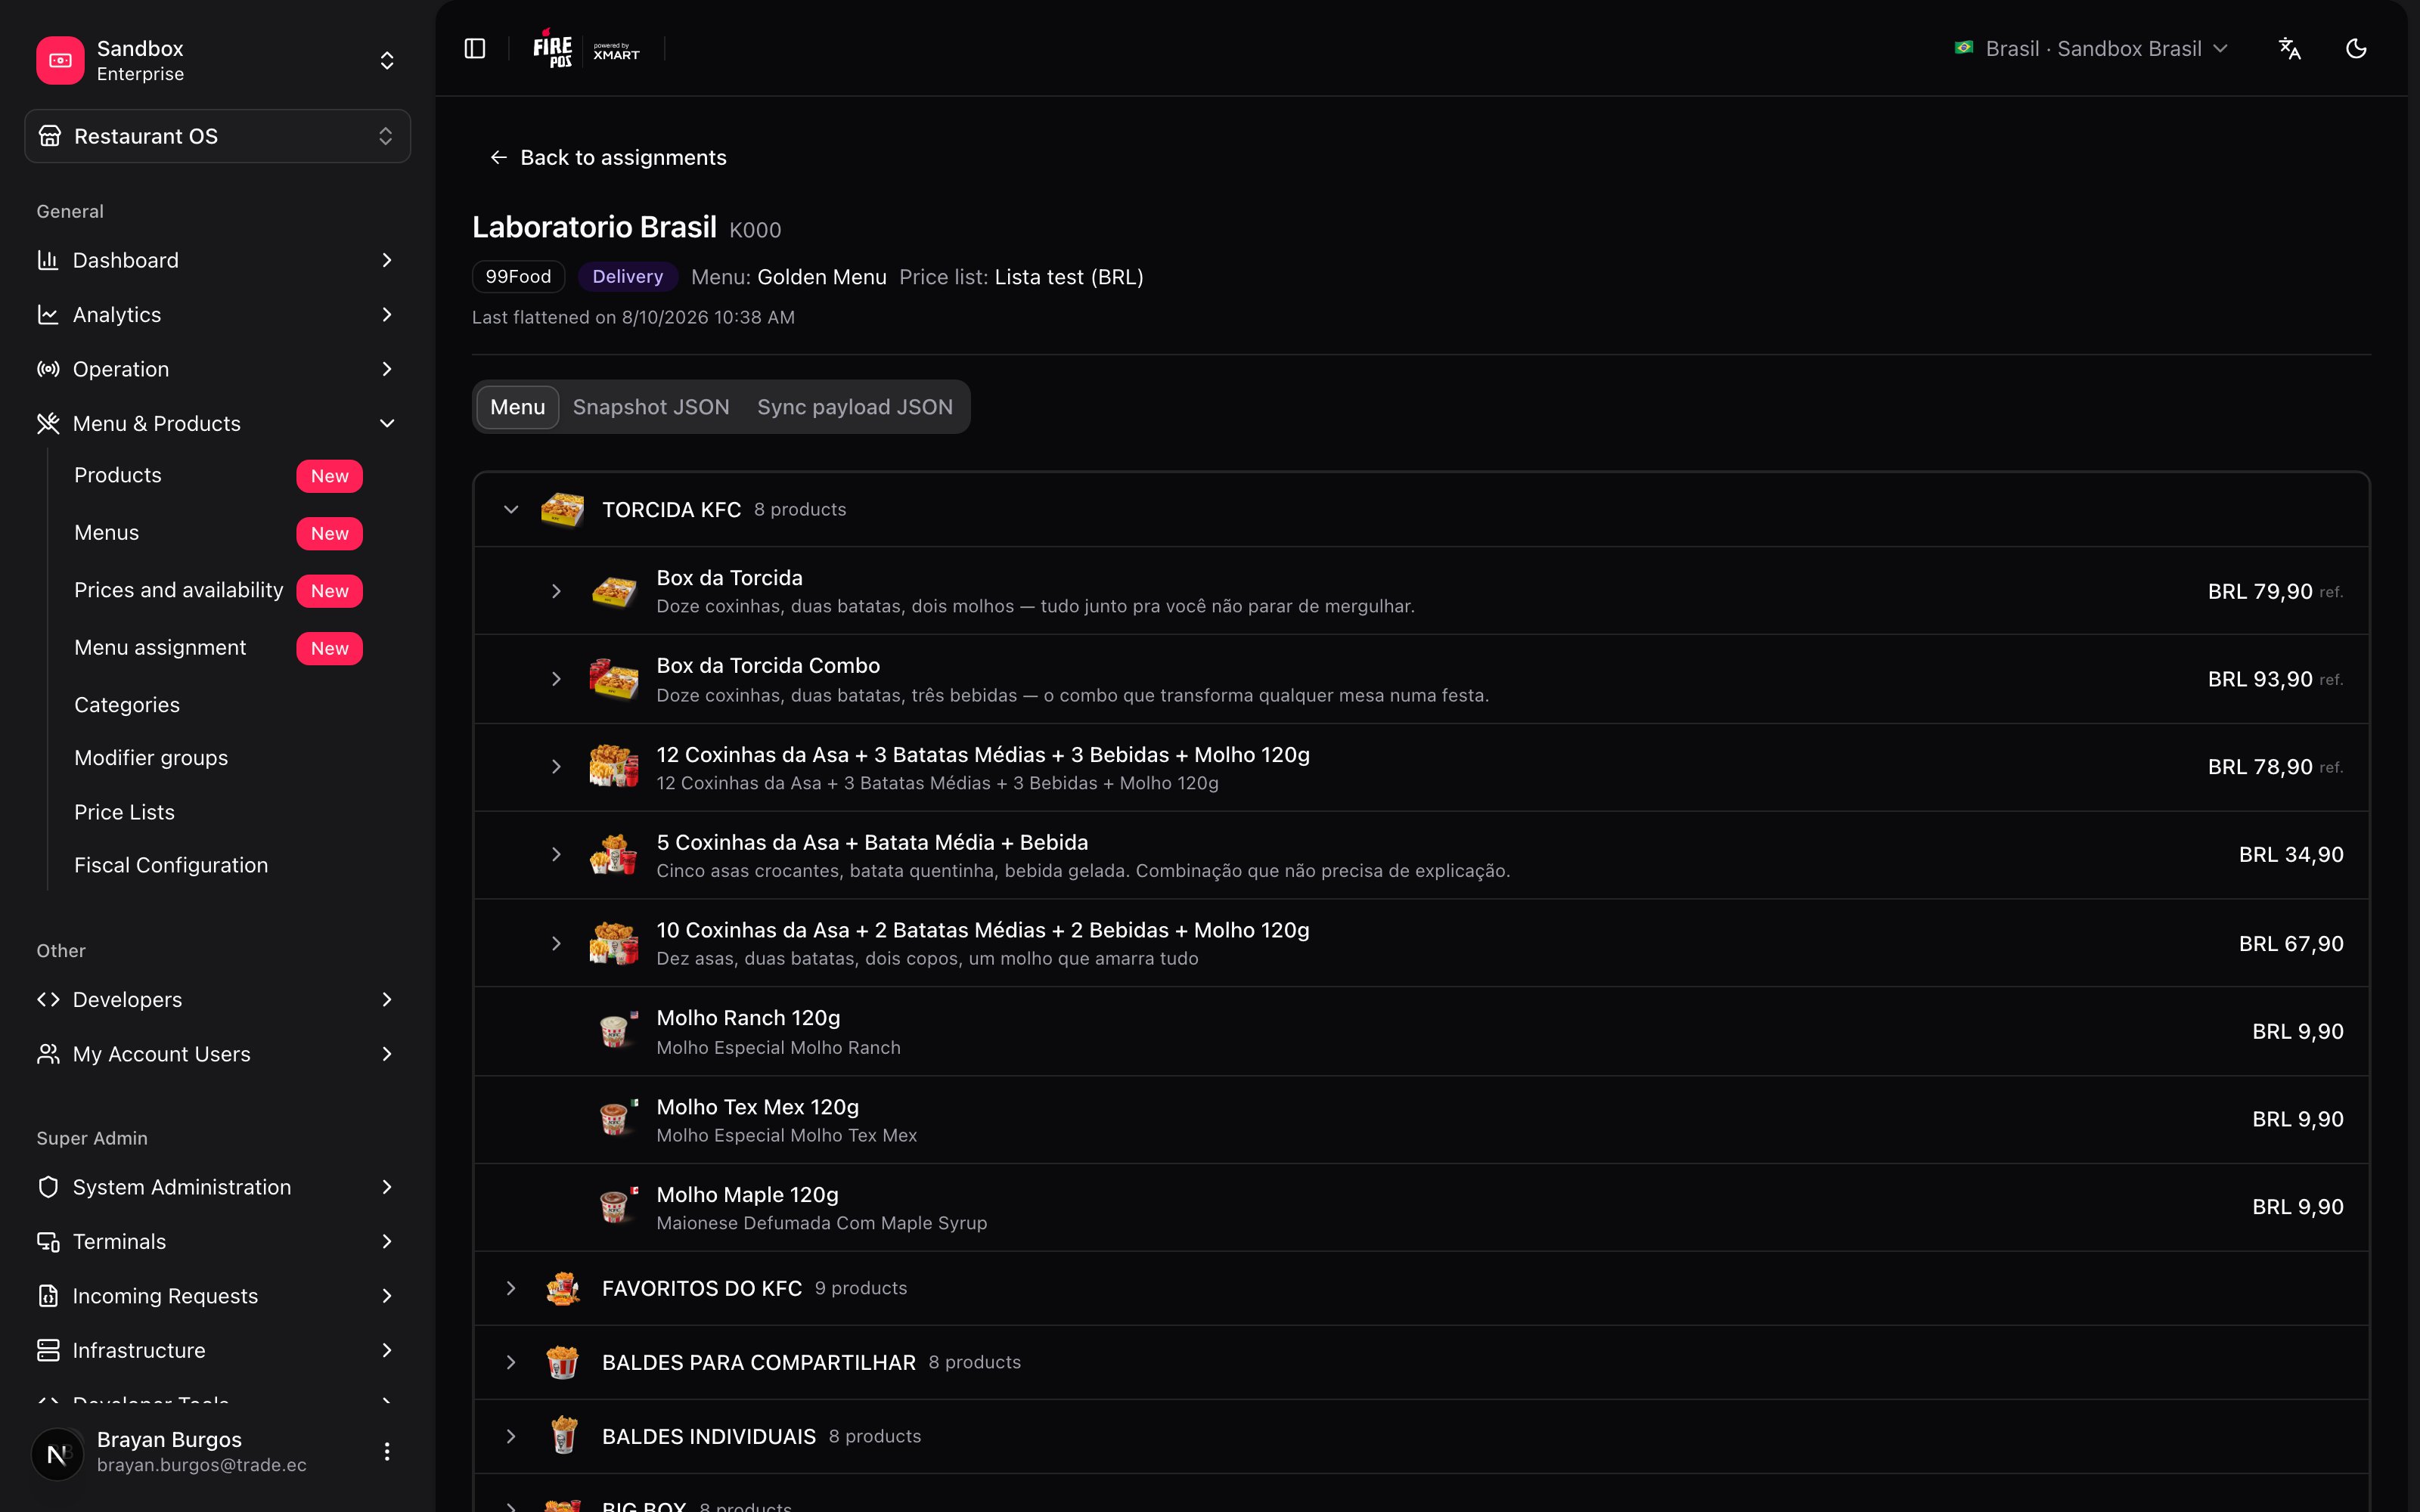
- Menu — the menu as it ended up: categories, products, prices and modifiers.
- Snapshot JSON — the same menu, raw.
- Sync payload JSON — exactly what was sent to the channel.
Changing the price for a single destination
There’s a separate screen, Prices and availability, for adjusting prices and visibility on one specific destination without opening the whole menu or the whole list. It works on the rows that already have a menu and a list assigned from here. Its rule is worth knowing, because it isn’t obvious:- The price you change there lives in the list, and that list may be shared by several destinations.
- Visibility lives in the menu, which may also be in use across several destinations.
- But saving syncs only that one row. The other destinations pick the change up on their next Sync.
Recipes: how the real cases get solved
Putting a new store on sale
Putting a new store on sale
- Filter by the store with the Store selector. Its rows will appear, one per channel and fulfillment type.
- Select all the ones that store will serve.
- Assign list with the list that belongs to it.
- Assign menu — remember to filter by Fulfillment and do it one type at a time, or the Golden will be all you can assign.
- Select everything again and Sync.
- Wait for the statuses to go from Pending to Synced, and check whether any row came back with warnings.
Stopping sales on a channel
Stopping sales on a channel
- Filter by that Channel.
- Select the rows.
- Assign menu → Remove assignment.
You raised prices and want them to reach the channel
You raised prices and want them to reach the channel
After saving the increase in the price list:
- Filter by Price list with the list you touched. Every row using it comes up.
- Select all of them.
- Sync, in batches of 50.
A product isn't showing in the app and nobody knows why
A product isn't showing in the app and nobody knows why
Walk it in this order, which goes from the most common to the rarest:
- Is the row Synced? If it’s Failed, that’s where the trip ended.
- Are there warnings? If the product has no price in the assigned list, it wasn’t sent — that’s the most frequent cause.
- Open View sync preview → Menu tab. If the product isn’t there, it never left Fire.
- Open the assigned menu. Check whether it’s removed (Removed) or hidden (Hidden).
- Check Out of stock. It may be turned off by the day’s operation.
A price change, followed end to end
You raised a product from 10.90 to 11.99 on the Delivery list. This is what happens at each link:
The row to watch is the third one: a Synced status doesn’t mean what’s published is current, it means the last sync went through. If you changed prices after that dispatch, the channel is still on the old ones until the next.
Mistakes that cost money
Glossary
Frequently asked questions
The row ended up Failed
The row ended up Failed
The channel rejected the dispatch. Check that the menu has products and the list has prices, and sync that row on its own to see whether the error repeats. On the menu you’ll also see the “Sync failed — menu snapshot is outdated” banner.
Can I republish last week's version?
Can I republish last week's version?
No. There is no versioning: every Sync flattens the menu and the list exactly as they are at that moment. To go back, you undo the change on the menu or the list and sync again.
What’s coming
- Versioned snapshots, so an earlier state can be republished without undoing changes by hand.
- Aggregator channel status: today aggregators receive their events, but the outcome isn’t reflected in the sync status you see here.
- Bigger batches: the 50-per-dispatch cap is a defense against timeouts, not a goal.